

Perfect Pie Crust Tutorial Recipe
Perfect Pie Crust Tutorial Recipe
Learn how to make perfectly flaky and buttery crust, every time. Our Pie Crust Tutorial will become an essential tool in your baking arsenal, and once you’ve perfected this simple recipe, you can have homemade pies and quiches whenever you want.
Perfect Pie Crust Tutorial Recipe Instructions

Ingredients
Prep Time:
Cook Time:
Total Time:
Yield: 1 pie crust
-
2 cups all purpose flour
-
½ cup butter
-
½ tsp. salt
-
4 or 5 tbsps. iced water
Directions
-
Cut the butter into small cubes and put it in the freezer to chill.
-
Place the flour in a mound on the counter. Make a large indentation in the center – this should look like a crater of sorts. Grab the butter from the freezer and place the cubes in the center of your “crater”. Sprinkle ½ tsp. salt.
-
With the tips of your fingers, start breaking apart the butter and mixing it with the flour, working it until you get a coarse, meal-like texture.
-
Form a small mound, indent the center again, and add 3 tablespoons of iced water. Form the dough ball.
-
Start forming the dough with your hands, folding from the outside in. Keep adding the rest of the chilled water (1 or 2 more tbsps.), until the dough ball comes together. Don’t knead. You want the dough to be on the softer side.
-
Flatten the dough into a disk and wrap in plastic film. Chill in the fridge for at least 20 minutes.
-
Roll out the dough on a lightly floured surface. When rolling out, keep rotating (for uniformity) and sprinkling more flour to the dough (so it won’t stick). Depending on the tart pan you’re using, make sure you roll at least 2 inches more than the diameter of your pan.
-
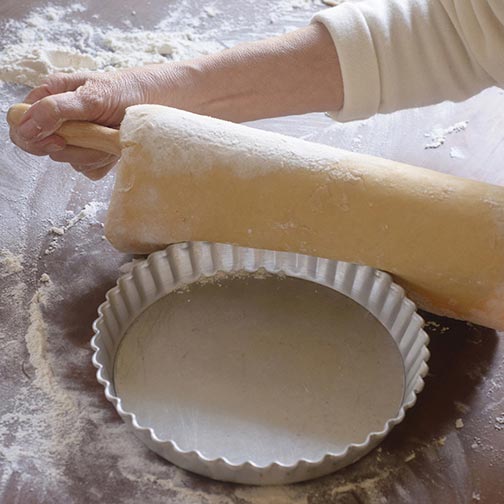
Wrap the dough around your rolling pin, and unroll into your tart pan, previously brushed with melted butter so it won’t stick.
-
Finally, press gently with your thumbs on the bottom and edges of the mold, making sure the crust makes contact with the pan.
-
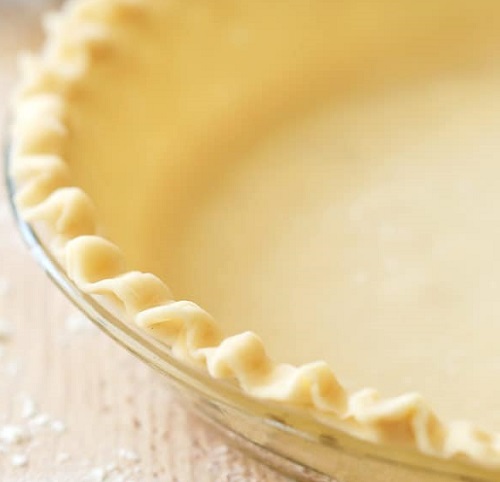
Let at least 1 inch of dough overlap over the edge of the tart shell. Then, crimp it with your fingers, or press your rolling pin over the edge, to flatten. Cut any excess with a knife or kitchen shears.
-
Chill in in the fridge for 15 minutes before using.
-
If you want to reserve the pie crust for later, just wrap it in plastic wrap and freeze.
-
Cut the butter into small cubes and put it in the freezer to chill.
-
Place the flour in a mound on the counter. Make a large indentation in the center – this should look like a crater of sorts. Grab the butter from the freezer and place the cubes in the center of your “crater”. Sprinkle ½ tsp. salt.
-
With the tips of your fingers, start breaking apart the butter and mixing it with the flour, working it until you get a coarse, meal-like texture.
-
Form a small mound, indent the center again, and add 3 tablespoons of iced water. Form the dough ball.
-
Start forming the dough with your hands, folding from the outside in. Keep adding the rest of the chilled water (1 or 2 more tbsps.), until the dough ball comes together. Don’t knead. You want the dough to be on the softer side.
-
Flatten the dough into a disk and wrap in plastic film. Chill in the fridge for at least 20 minutes.
-
Roll out the dough on a lightly floured surface. When rolling out, keep rotating (for uniformity) and sprinkling more flour to the dough (so it won’t stick). Depending on the tart pan you’re using, make sure you roll at least 2 inches more than the diameter of your pan
-
Wrap the dough around your rolling pin, and unroll into your tart pan, previously brushed with melted butter so it won’t stick.
-
Finally, press gently with your thumbs on the bottom and edges of the mold, making sure the crust makes contact with the pan.
-
Let at least 1 inch of dough overlap over the edge of the tart shell. Then, crimp it with your fingers, or press your rolling pin over the edge, to flatten. Cut any excess with a knife or kitchen shears.
-
Chill in in the fridge for 15 minutes before using.
-
If you want to reserve the pie crust for later, just wrap it in plastic wrap and freeze.
This site contains product affiliate links. We may receive a commission if you make a purchase after clicking on one of these links.